Wednesday, December 31, 2008

Quickie Snowflake Earrings


These use the techniques of beads dangling on picots, climbing out of a ring with a mock picot formed with a lockstitch, and zigzag chain.

For pattern in pdf format click here.


Materials:

Size 80 tatting thread or glacé quilting thread

48 size 11 seed beads

1 tatting shuttle

2 earring findings


For each earring, string 24 sb onto the thread. Have 6 sb on the shuttle, 18 on the ball thread.

Center r 1--1-1--1-1--1-1--1-1--1-1--1, cl. Lockstitch to make the 6th small p. *Ch (with a b in each p) 6-2-2-6. J to next small p on center R. Repeat from * for a total of 6 “branches”, and j at the beginning.


ZZ ch 4/4, 3 times. Slide 6 b up from the shuttle. R (with a b in each p) 2-2-2-2+ ( to earring finding) 2-2-2-2, cl.


Stiffen, if desired, with clear nail polish, extra-hold hairspray, or a commercial stiffening product. Or, try this tip from Ruth Perry:

"Try tatting them in Hand Quilting thread that has a glaze on the thread. Dip in hot water, and press between clean cloths. This will give them stiffness that will hold its shape and they will still be dainty."


Abbreviations:

b bead
Ch chain
ds double stitch
j join
+ join
p picot
- small picot
-- large picot
R ring
sb seed bead
/ separates stitches on each side of split ring, or sets of zigzag tatting ZZ zigzag, or rickrack tatting of set stitches (first half of ds repeated a number of times, followed by second half repeated a number of times, completing one set)

"Vision" tatted necklace

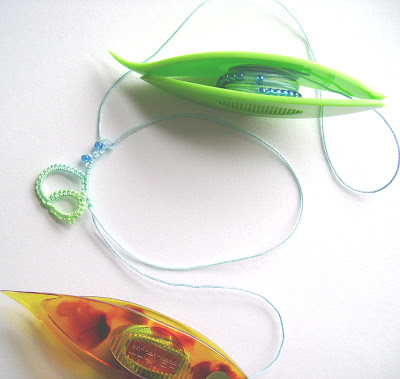
This necklace is made in two halves, which are joined together while working. The left hand side (as you are looking at the necklace facing you) is made first; it is the half shown in the diagram. Then the right hand side is made, joining while working to the central picots. The neck cord given in the pattern is just a zig-zag chain, but embellishments can be added!

For pattern as pdf click here.


Supplies:
  • Size 10 6-cord mercerized crochet cotton.
  • 24 seed beads size 8 (8/0). These are a little larger seed bead.
  • 9 pearl beads size 4 mm (referred to in this pattern as medium bead)
  • 1 pearl bead size 6 mm (referred to in this pattern as large bead)
  • "Lobster claw" clasp finding
  • 2 tatting shuttles
  • Small steel crochet hook for tricky joins and for bead stringing

Shuttles are numbered 1 (normal shuttle position) and 2 (ball position). They switch positions as needed.

String 19 sb onto the thread. Wind shuttles with 18 sb on sh 1, 1 sb on sh 2.

Start at large R 2-2-2-2-2-2-2-2-2-2-2-2-2-2 (13 p) cl. Center R of 2+ (to first p of large R) 2--(3 cm when open, it will need to be able to hold 3 mb when closed with room to j) 2-3--(15mm when open, it will need to be able to hold 1 lg b when closed with room to join) 3, cl. Do not RW, SS.

Ch 5-4+(to 2nd p of large R) 3--(containing 17 sb, do not pull tight but allow sb to dangle with bare thread exposed on each end of p equal in size to about 1 sb) 12+ (to 7th p of large R).

Ch 7, RW. R 6+6 (to large p with 3 mb added before j).
SS. Ch 8, sh j to end of pr Ch. RW, SS.
Ch 11. Then sh j into the tiny space bet end of prev Ch and the R. ---

Now comes the row of SR "flowers". SR of 2p/3p, 1 ds bet. Note: the st on the back side of the SR are worked in reverse order with 2nd half, then 1st half so the st unbroken by the p are all on the same side. For this project I consider the "picots only" side up to be most effective in giving a flower-like appearance. Do a total of 4 of these SR. RW.

R 6+6 (to large p with 3 mb on it) cl, RW. Ch 11. RW. R4+4 (to small p on center R) cl, SS. Ch 1--(3 cm long when open) 12. Sh j to end of lower Ch. RW, SS. SR 6/5, SR 5/4, SR 4/4 SR 4/4, SR 4/3, continuing with ZZ Ch 4/4, p, 4/4. Sh j to end of 1st SR flower. RW. SS. ZZ Ch 4/4, sj to p of prev Ch. ZZ Ch 7 sets of 4/4. RW. R 5 + 6 (j bet 1st and 2nd SR). RW. SR 5/4. Slide up 1 sb from each sh. Secure with lock stitch.

Continue with ZZ Ch of sets of 4/4 for neck cord. After about 7 1/2 inches, end with R of 5+5 (j to clasp).

The other side of the necklace is worked in pretty much the same way, with some minor changes since it is mirror image to the first side.

Only 5 sb need to be strung, putting 4 on sh 1, 1 on sh 2. Start with the center R instead of the large R, joining with the lg b to the corresponding p of finished side.
You will need to RW instead of SS to do the Ch after the large R on this side. J to the corresponding p of finished side.
When j to the large beaded p, have 7 sb hang near the tatting, 10 sb away. RW and SS before the flowers on this side. The flowers are 3p/2p on this side. After flowers do not RW. Use sh closest to 6+6 R to make it.
After Ch 1+(with 3 mb to corresponding p of finished side)12, do not RW. SR row is 5/6, 4/5, 4/4, 4/4, 3/4. Tat the ZZ Ch neck cord for about 4 inches and then 8/8 split rings for about 3 inches or length desired. Finish with a normal 8-8 R, with the 3 remaining sb in the p.


Copyright © Marilee Rockley 2006


Abbreviations:

b beads
bet between
Ch chain
cl close
cm centimeter
ds double stitch
j join
+ join
lg b large bead
mb medium bead
mm millimeter
p picot
- picot
-- large picot
pr previous
R ring
RW reverse work
sb seed bead
mb medium bead
mm millimeter
p picot
- picot
-- large picot
sep separated
sh shuttle
sh j shuttle join, or locking join
SR split ring
SS switch shuttles
st stitch
/ separates stitches on each side of split ring, or sets of ric-rac tatting
ZZ zig-zag, or ric-rac tatting of set stitches (first half of ds repeated a number of times, followed by second half repeated a number of times, completing one set)

Sunday, December 28, 2008

Tuesday, December 23, 2008

A bell pattern for you

Here is a gift to all my blogging friends - a tatted bell pattern!
For pdf click here.

Supplies:

  • 2 shuttles
  • Thread of your choice (the finished bell measures about 1 and 1/4 inches (3.2cm) long in size 20 DMC Cordonnet Special)
  • A small crochet hook is helpful for joining picots


Techniques used:

  • Split rings
  • Rings floating from chains
  • Join on 2nd half of split ring

Note: all joining picots are small. The decorative picots can be longer as desired.

R 8-6-8. Do not RW, SS. Ch 15.

RW. SR 3+3/4-4.

*Ch 4. Using Sh 2, R 3+5-3. Ch 4. Using Sh 2, R 3+3-3--3-3-3.

Repeat from * 2 more times.

Ch 4. Using Sh 2, R 3+5-3.

Ch 4. RW. SR 3+3/4+4. (Note: 2nd j is on 2nd half of SR, so be sure that the core thread still slides)

Ch 15. LJ to beginning. SR 8/8. Thread ends may be used for hanging as an ornament.


Saturday, December 20, 2008

Burnin' the "Midnight Oil"

"Midnight Oil" is the darkest thread I have ever dyed! It is a dark red shading into black. Black is such a hard color to dye, but I think this turned out fairly well. I tatted a necklace experiment from it. Some good elements in the necklace, I think, but I want to change some parts of the design.

Thursday, December 18, 2008

Old snowflakes and other fiber stuff

These tatted snowflakes with embroidered cloth centers are ones I made many years ago, I think over 20 years - back when I had the patience, LOL. They were starched with sugar starch, and are still white and stiff. No problems with bugs whatsoever, but then I live in a cold northern climate! I have since been experimenting with various stiffeners. There are a lot of ways to get things to be stiff - the extra-hold hairspray is next on my list to try.

Sometimes I do take a small break from tatting and dyeing! Here is a knit slipper top in progress:
The loom got warped again, this time with warm wools for a winter scarf. As usual, it's not really according to any plan...this scarf is the sampling! Its just for fun and warmth.

Monday, December 15, 2008

"Dream" necklace and earring set or pendant


For pdf of this pattern click here.
To see a video of this pattern in progress click here.

Supplies for necklace:
  • 2 tatting shuttles
  • Size 20 or 10 crochet thread
  • 62 seed beads (Size 10/0 or 11/0 with size 20 thread. Or, use size 8/0 with size10 thread.)
  • 3 leaf or drop beads
  • 1 barrel or lobster claw clasp

The strung beads are all on shuttle 2.
Fill shuttle 1 first, and then measure off about 4 yards of thread and cut.
String 2 seed beads, 1 drop bead, 6 seed beads, 1 drop bead, 6 seed beads, 1 drop bead, 20 seed beads.
Wind shuttle 2 and you are ready to follow the diagram.

After the center ring is worked and closed, the chains and floating rings are added in the same round.
The split ring is worked last, leading into the neck cord.
Copyright © Marilee Rockley 2006

The larger pendant shown in the above photo is a variation on the basic pattern. It's begun the same as an earring, then an extra round is added, with chains of about 9 or 10 ds each. The small rings are 3-3. The dangling rings have a few extra ds than the ones on the earring - 10 on each side instead of 8, and an extra ds between beads on the center dangle.

I called it "Dream" because I think it somewhat resembles the hangings that are called dream catchers. Anyway, this set is worked in my own HDT, size 20.

Thursday, December 11, 2008

Strung beads between split rings

The beads are strung onto the thread, and wound back a few turns on each shuttle before starting to tat. After making a split ring, slide up from each shuttle the number of beads desired.

These beads are then secured with a "lock stitch". There are a couple of different ways to do this - I've shown in the photos what I usually do. The first half of a double stitch unflipped...

...followed by the second half of a double stitch flipped, as usual.
Then the beads are locked in place, and the next split ring can be made. I like using this technique for tatted jewelry designs.

Monday, December 8, 2008

Artisans and Entrepreneurs Holiday Market at Discovery World 2008

Here's my booth, and me wearing my butterfly necklace - do I look like I'm having fun?

My tatted jewelry display - my work received many compliments, and several sales! Also seen here is my book, and the sign-up sheet for tatting classes - I did get two very eager people to sign up!

My HDT looked lovely in the bins, but, surprisingly, did not sell at this general market. So now I know, I don't have to take my whole store next time.

Some shoppers browsing the various displays. There was a wide variety of handcrafted items to choose from!

Thursday, December 4, 2008

"Glowing Embers" heart necklace

Combination polymer clay and tatting - a free form style. I am very busy getting ready for the Artisans and Entrepreneurs Market happening this weekend, but I was happy to get this done in time to show it. Due to the art show preparations my etsy shop is temporarily closed (sorry for the inconvenience!) but will re-open on Monday, Dec. 8.

Friday, November 28, 2008

The show's approaching - only time for one more batch


Just one more week to prepare for the Discovery World Artisans and Entrepreneurs Holiday Market! I am beginning to get nervous about it - my biggest fear is that my booth will look sparse and pitiful compared to the other booths. So I will be dyeing one more large batch ("Pansy") this week, but that one will not go into my Etsy shop until after the show. I am also working on a couple of necklaces I hope to get done, and as many earrings as possible! In the harvest art fair I did last summer, the earrings were what sold. I'll be demonstrating tatting, and I'll have a sign-up sheet for people who may be interested in tatting lessons.
The very next day I am playing my cello in the MFSO "Messiah" concert! So Dec. 6-7 will be a very busy weekend!

Monday, November 24, 2008

My article in "Belle Armoire Jewelry"!

Another "too good to be true" moment!

A whole article, by me, (4 pages!) in Belle Armoire Jewelry Winter 2009!

To top it off, my article appears first, right after the table of contents! The photos were taken by their own professional photographer, and are absolutely glorious!

A dream come true! I encourage you to check out the submission guidelines for this and other magazines, and submit your own original designs - the next article could be by you!

Thursday, November 20, 2008

"Tigereye" and student work

Someone - actually several people - had requested "Tigereye" HDT quite some time ago, and I have finally got around to it (a round tuit, LOL!) This batch is a bit more intense than my previous attempts at this colorway.

The tatting in the above photo is the work of my tatting student, done on her own in about 3 weeks time, after only one lesson! This lady is amazing! I've never had anyone pick it up so quickly. Last night she learned about sewing in ends, tatting over ends, and working with 2 shuttles. She will be returning for a lesson in split rings soon. This tatting student found out about me when I had a display at the Bead Needs bead shop, which sadly has gone out of business. So I've been teaching her at home. I'll try to find another shop or other public venue that would be interested in having me teach tatting classes.

Wednesday, November 19, 2008

White necklace with red beads - done!


"Toccata" is the title I gave to this one. A musical term, "toccata" means a composition in free style. Well, the name fits, I think. Anyway, it was fun - even though these beads gave me a little trouble. The holes seemed a little smaller than some beads I've worked with. Glad I had a "floss threader" handy to deal with them!

Thursday, November 13, 2008

Necklace center, and art fair approaching


The center part of the necklace - not too bad. But, it could use more stability, so for next time I will add more joining picots, and make other adjustments. Seeing possibilities brings out more ideas. Now, the sides - the easy part, yeah!
The big news - I'm going to be a vendor in an art fair! Hopefully the poster will get bigger if you click on it. I will be bringing the contents of my etsy shop and my books, and I will demonstrate tatting! The plan is to have a sign-up sheet for people to put their contact info on if they are interested in tatting classes.

Wednesday, November 12, 2008

Tatting in "Needlework News"!

Hey, knock me over with a feather...what an honor! I'm in the Nov. 12 "Needlework News", edited by Denise Felton at "Craft Gossip". How cool is that?!!

LadyShuttleMaker, you're included in one of the related links as well - mentioned by TattingChic!
Lighthouse Lacers got a promo too! Woo- hooo!!!

Monday, November 10, 2008

"Lava" Hand dyed, and some newer books collected


Well, I kicked around several names for this unruly, "mind-of-its-own" batch. The reddish part couldn't decide if it was burgundy or rust, and the darker area didn't know if it wanted to be brown or gray. Finally, I decided the colors were similar to the rocky ground cover sold at the garden center as "lava rock", so "Lava" is what this batch came to be called. The earrings in the photo were tatted from this new HDT, and are from a pattern that is in my "Boutique Tatting" book.

Speaking of books, here are some newer ones that I have acquired during the last few months. The 3 in the back row are by Iris Niebach, the one with Daisy Picot Patterns is by Riet Surtel-Smeulders, the center one is one of Linda S. Davies' tatted flower books, and the Ornament Tatting 1 is by Heather Johnston. All lovely designs! Of these, the book best suited to beginning tatters (IMHO) would be the one by Heather.

Wednesday, November 5, 2008

Stubborn little beads

Some seed beads just don't want to fit onto the picot. In that case, I have resorted to using a "floss threader" and a helper thread to get them on. More about that technique here.


There has been a little progress on this necklace design. I like the interlocking beaded picots at the center, but I have discovered that my original plan for the large picots with beads dangling won't work. So my next idea is to add some more tatting at the lower edge to connect these dangling picots to.
-----

I took my "Boutique Tatting" book to show the office ladies at the dentist! (Well, I had been telling them about it while I was still working on it, and they said they wanted to see it when finished!) The dentist himself was so impressed, he took a photo of me with it to put in his newsletter! Even a patient still in an exam chair asked to see it! Such excitement, it almost made the dental bills seem not so bad...almost, LOL.

Friday, October 31, 2008

"Nicobar Pigeon" HDT batch, and an honor on Etsy

While visiting the zoo a few weeks ago, I spotted this beautiful bird with brightly colored, iridescent feathers. I immediately thought, "What great colors for a dye batch!" The photo above is the best picture I was able to take of it, which doesn't show that there is a little red on the bird as well.
Here is my attempt to capture the colors of the Nicobar Pigeon in thread.
-----
In other news, I found out this morning that my red tatted necklace "Ruffled Orbit" was included in "Treasury West" on Etsy - (a tempory honor, so the link will only work for a while). Anyway, it's so nice to get recognition for one's work!

Tuesday, October 28, 2008

How about a picot 2.25 inches when open...

...change a stitch count here and there, move some beads to the other side...hmmm, I think there may be possibilities.

What is going on here? I am working out another necklace design. I ran out of the "Blue Green Pastel" HDT used in the rough draft on the left. So the next attempt (in progress) on the right is being worked in white with red beads, which I think will be a pretty combination.

More to be shown as it is completed.

Friday, October 24, 2008

Beads on 2nd half of split ring


I am working on a design that will have beads on the 2nd half of a split ring. The beads for that need to be on the 2nd shuttle. Since the double stitches on the 2nd part of a split ring are not flipped, the beads are added differently than in a normal ring. The beads are kept on the shuttle until needed, then slid into place.


Because I tat a split ring by taking it off my hand, turning the working loop over, and replacing it on my hand to tat as usual, the unflipped double stitches appear "back side up". (Another way to tat the split ring is the "dead spider" method, but I am not so familiar with that technique.)
Anyway, with either working method, the unflipped stitches are worked 2nd half, then 1st half - which can get confusing! If I get lost, I have found that if it "looks" like I should do a 2nd half, that's the one needed - though it is really the "1st half" here! (Confused enough, yet?) Sometimes it helps to look at the other side, to see if the stitches look consistent.


So this is the "back side" of the completed split ring in the tatting so far. But, if I were a perfectionist, I would do something about the other ring - which has its "back side" the other way - oops! Well, people who have tatted my patterns know that I tend to take a casual attitude about "back side, front side" anyway - sometimes!

Thursday, October 23, 2008

"Ruffled Orbit" tatted necklace - version 1


So, here is what I came up with the first time. Not bad, but I think I would change a few things if I tat this design again. The center part could be improved, possibly by including 1 or more larger beads at that area. I am not sure if the large "orbits" need more stability with a few more joins, or not. More pondering, while this design rests a bit.

Wednesday, October 15, 2008

"Ruffled Orbit" in progress

Currently I'm working on a tatted necklace design I will call "Ruffled Orbit". It uses my goofy method of putting a bead in the center of a split ring by tatting a long picot on a short chain, then tatting the split ring, and using a shuttle join at the end of the beaded picot. The result is a bead that is slightly tilted in the split ring, resembling an off-kilter"orbit". More on this technique later.
-----
Due to some inquiries from needle tatters about my patterns, I've made a perfunctory attempt to understand the basics of needle tatting.
However, I've decided that I am not going to try to become knowledgeable enough to be able to translate my patterns into needle tatting.
But fear not - there is a lot of talent emerging, and I'm sure that designers unique to the art will publish many creative patterns written especially for the needle.
-----
To any local readers of this blog (in the Milwaukee, Wisconsin area) I have a beginning shuttle tatting class scheduled for the evening of Oct. 30, with 1 student already signed up. You may contact me for further info via email (my email address is listed with my profile).
-----
Of interest to HDT addicts, a fresh "Snowflake" batch of hand dyed thread is now available in my etsy shop. Also soon to be added are a few more skeins of "Sugar Maple" along with a couple "mini-sets" of solids. Then, after they are rinsed and dryed, a limited amount of dark green "Forest" will be added. Just more fun stuff to play with!