

Monday, July 25, 2011
Purple and silver
Saturday, July 23, 2011
The Winner! And 2 more winners!
The lucky winner of the Garden Afternoon Giveaway is Donna!
And, there are 2 consolation prize winners (they'll receive hand dyed thread samples). They are Gemini and Kathy Niklewicz.
And, there are 2 consolation prize winners (they'll receive hand dyed thread samples). They are Gemini and Kathy Niklewicz.
Wednesday, July 20, 2011
Garden Afternoon GIVEAWAY


 Hey there, leave a comment on this post if you want a chance to win a mini set of 5 colors from the Garden Afternoon batch plus a skein of the multicolored thread - all size 20. The mini skeins are 20 yards each, and the multi is 50 yards, so the prize total is 150 yards of brilliantly colored hand dyed thread, done by me. I'll announce the lucky winner on Saturday, July 24.
Oh, and there is more in my Etsy shop, but it's going fast! When it's gone, it's gone...I dye all these myself, so naturally the supply is small, limited to how much energy and time is available.
Friday, July 15, 2011
Psychedelic Soft Boomerang tatted earrings


Thursday, July 14, 2011
The "secret" revealed 11-18-11
I can tell you now! I'm getting a book published!
NOT self-published, like my previous books, but by a REAL publisher!!! You've heard of Annie's Attic from DRGnetwork? They've informed me that my book, Tatted Jewelry, will go on sale 11-18-11, just in time for Christmas gifts. That's the "secret" I was working on April through June.


NOT self-published, like my previous books, but by a REAL publisher!!! You've heard of Annie's Attic from DRGnetwork? They've informed me that my book, Tatted Jewelry, will go on sale 11-18-11, just in time for Christmas gifts. That's the "secret" I was working on April through June.


Wednesday, July 13, 2011
Hot summer treats!


Plus, blue and orange together - what was I thinking?
When they're gone, they're gone - that's all, folks.
Tuesday, July 12, 2011
One handed tatting a ring
 |
| Shuttle thread arranged into a circle, and 1st half of double stitch |
 |
| 1st half of double stitch continued |
 |
| Letting the knot "flip" |
 |
| Flipped 1st half |
 |
| Sliding into place |
 |
| 2nd half of double stitch |
 |
| 2nd half flipped |
 |
| Sliding into place |
 | |||
| Forming a picot |
 |
| Enlarging the circle by pulling the thread below the ring |
 |
| Closing the ring |
 |
| Closing the ring - nearly done |
 |
A finished ring
My one handed tatting student is a beautiful teenaged girl who was born without a left hand. She is a very determined and talented girl! She was very attentive at her first tatting lesson, and did really well! Here is a photo of her very first one ring butterflies!
I really appreciated the expert assistance offered by Sue Anna who came (quite a distance!) to help. She taught the mother regular shuttle tatting while I taught the daughter the pillow method (learned from the book, Tatting with One Hand by Helen A. Chesno). Sue Anna devised some really cute little rhymes and songs to accompany tatting and kept us all "in stitches".
The one handed method of tatting a chain is shown on another post: http://yarnplayertats.blogspot.com/2011/07/one-handed-tatting.html |
Monday, July 11, 2011
One handed tatting
The reason why I am learning this technique is that one of the students coming to tatting class was born with only one hand. The method of pinning the tatting to a pillow as a substitute for a left hand was invented by Helen A. Chesno and Gladys Flynn. The how-to is described in detail in the book, Tatting With One Hand (Tatting For the Physically Handicapped) by Helen A. Chesno, published in 1984. I purchased the book from Lacis.
The photos below show my attempt at tatting a chain in the one handed method. The one handed tatted ring tutorial is on another post: http://yarnplayertats.blogspot.com/2011/07/one-handed-tatting-ring.html
The photos below show my attempt at tatting a chain in the one handed method. The one handed tatted ring tutorial is on another post: http://yarnplayertats.blogspot.com/2011/07/one-handed-tatting-ring.html
 |
| Working a chain - 1st half of double stitch |
 |
| 1st half of double stitch continued |
 |
| Letting the knot "flip" |
 |
| Flipped 1st half |
 |
| Sliding into place |
 |
| Tatting in progress |
 |
| 2nd half of double stitch |
 |
| 2nd half flipped and sliding into place |
Thursday, July 7, 2011
Bead on 2nd half split ring and other beady things
 |
| The 1st half of the Split Ring is worked like a normal ring. So, a bead on the 1st half needs to be slid into the working circle of thread before beginning the ring. But, the bead on the 2nd half (from shuttle 2) is slid up only when ready to make the bead picot. (Also seen are beads over picots, held temporarily with paper clips.) |
 |
| The finished bead picot. |
 |
| The finished Split Ring. |

The photos above show a remake (in progress) of a pendant design that I never got around to writing up. I've called it "Lacy Lantern" recently, but in the past I called it "Swallowtail". If you have an idea for a name for the pendant, feel free to state it in a comment!
By the way, the blinged shuttle was a gift from Lace-lovin' Librarian - thank you, Diane!

Friday, July 1, 2011
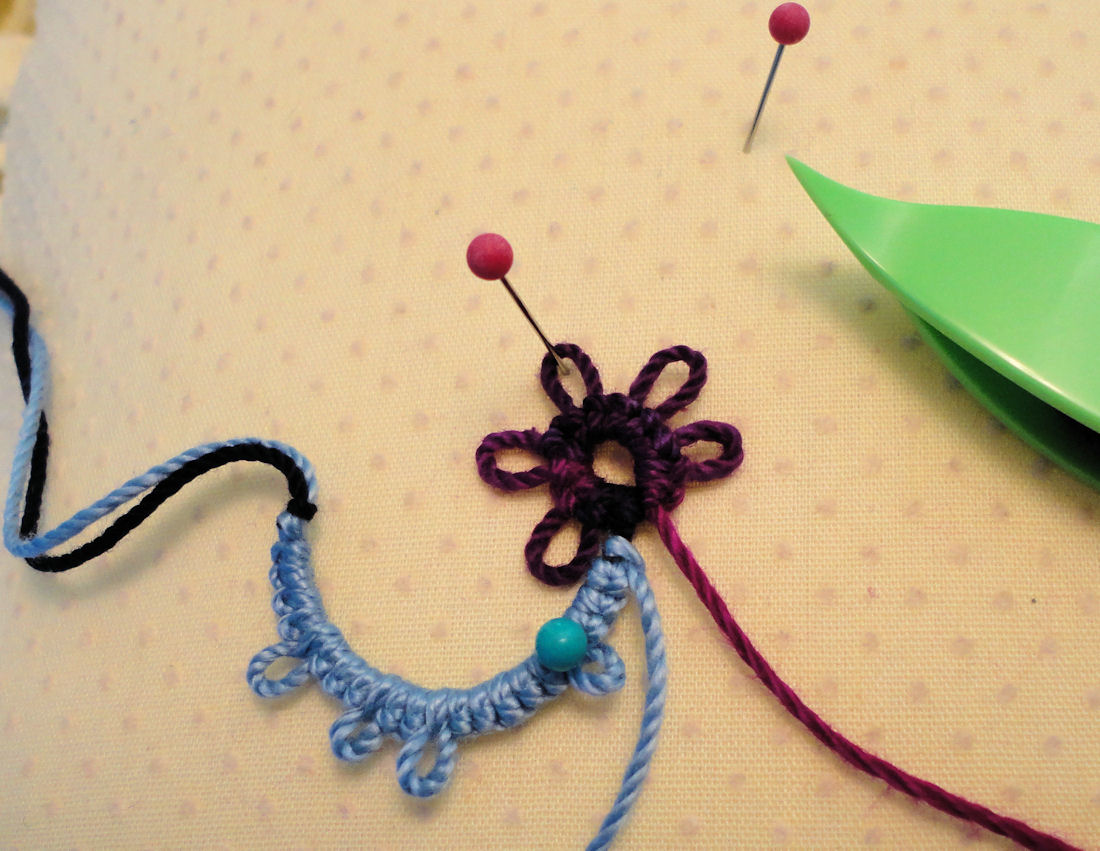
Improvised necklace in iris colors

 This purple, blue, and yellow necklace sort of just "happened", while I was trying to work out a different design. The first design didn't work (yet!), so I threw the samples into my "ideas bag". Then I got out some hand dyed thread and seed beads, and after a bit came up with an oblique shape that I thought looked pretty good. I then decided to try for a necklace, repeating the shape so there's one for each side and tatting a flower-like design for the center. I chose a solid color for the center for more contrast. I then had 3 separate motifs.
The pieces were put together by tatting around them, mostly chains. It seemed to me that a dark ecru would set off the hand dyed colors, then I outlined the whole thing with dark hydrangea color. I experimented as I went, putting in some "squiggly" chains (not sure about the proper tatting term for those!) and wrapping some chains in a vine-like effect. It was fun to do! Helped keep my mind occupied away from worries.

Subscribe to:
Posts (Atom)